
01.12.2007: Here I am again. It is Saturday, and raining here in Sydney. What s shame, it should be summer here. At least that gives me some time to look into the last open items for our SportCruiser kit. The most difficult one is the selection of a colour for the interior. Not that I would not know which colour to select, but CZAW has only one colour sample, and that one is in Czechia, whilst I am in Australia. They have sent me a scan of the sample, how accurate the colours are is however questionable. I will therefore send them some pictures of aircraft interiors (the ones I have already shown on this site) and ask them to tell me which colour of their chart matches which picture. Like that I hope that the error will be “within limits”.
19.12.2007: I’m on my way home, looking forward to the Christmas Holiday.
23.12.2007: I am back from Australia. I have to say that it was a very interesting time down under, but I was too busy to do much for our homebuilt project. In the meantime I did however receive a leather sample from CZAW to select the colour for the interior of our plane. Here a picture of it:
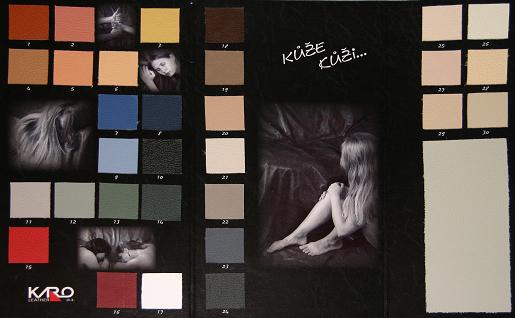
We finally selected colour Nr. 20, which is a light beige. I have the idea that the cockpit should look like a modern luxury car, such as a BMW…
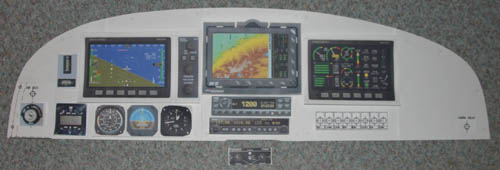
We also definitely added the Dynon HS34 to our options list, so the panel should look about as follows:
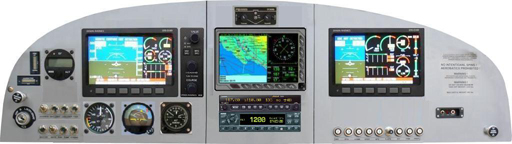
The HS34 adds several functions to the Dynon D-100 EFIS. The most important ones are:
- Largely expanded HSI functionality
- Use of knobs for adjusting the EFIS barometer, heading bug, course and timers instead of push button menus
- Providing interfaces to a range of NAV/COM units
- A built-in light level sensor to automatically adjust the LCD screen brightness
- Synthetic voice alert messages available for input to an intercom
- Additional EMS general purpose and contact inputs
To be honest, in my opinion the possibility to change the heading bug as well as the barometer by turning a knob rather than having to go through a set of menus alone is worth the price of the HS34.
Now only the radio and the transponder are still open.
27.12.2007: I have started with the detailed panel layout design. Under the “panel design” menu you can find a list of all items that will have to be installed somewhere. I also created a life size panel from cardboard (which is available in abundance after the kids have unwrapped all the Christmas presents…) and life size templates of all the instruments (which include the space required for mounting brackets etc). Now I can play with the layout without ending up with a panel that can’t be built.
I am still not decided whether I will use 2 1/2″ or 3 1/8″ backup instruments, so I made templates for both of them. I would prefer the smaller ones, it will depend however on what is available and at what price.
I will also try to put a map box somewhere, if I find space, as not having room for maps, checklists etc. always annoys me in the planes I rent. As maps and checklists will mostly be used for backup with our glass cockpit, except for approach charts, I play with the idea to create a map box behind the AvMap GPS or behind the right side of the panel. I have seen this on another kitplane and found it a brilliant idea.
The perfect size would accommodate a Bottlang manual plus a few maps.
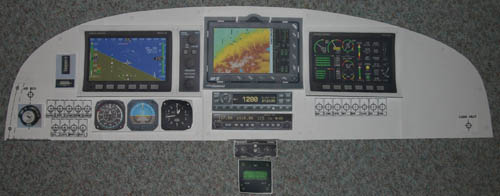
28.12.2007: I wasn’t sure about the exact size of the panel, so I posted a question on the SportCruiser Yahoo forum. I received the information in no time from John Ellis. He even sent me the drawings he made during a factory visit. Thanks a lot for that. My “panel planner” now looks like that:
29.12.2007: After playing a bit with my “panel planner” I can already conclude that the 2 1/2″ backup instruments will be a must, as the 3 1/8″ ones just won’t fit… I also realised that the centre section of the panel is just about wide enough for the AvMap GPS with the AirGizmo mount (195 mm vs. a hole for the mount of 189 mm), leaving practically no room for a frame. Also the space underneath for the radio and the transponder seems to be tight, especially as there seems to be some mounting reinforcement there. And I haven’t placed the switches yet…
I took the following picture at the Aero last April:
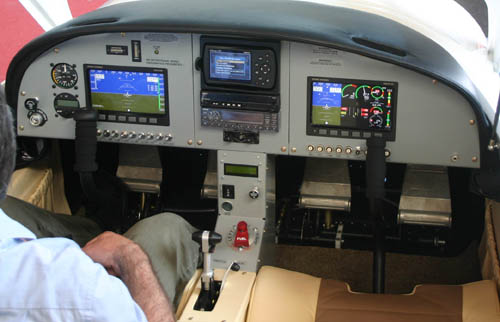
It shows that there is some room on the centre console, I might put the intercom there, and maybe some of the switches? The problem is that I also want an ergonomically correct panel, so putting things just where they fit is not an option…
Here a second attempt to solve the puzzle, with the intercom and the autopilot moved to the centre console:
Seems not too bad, at least all the switches are together, and the whole stuff to fiddle with during flight (GPS, transponder, radio, intercom and autopilot and even the HS34) is nicely grouped in the centre (I am right handed). There is even room for a map tray underneath the fuses, as well as to the right of the EMS. I just have to check what the wiring loom will look like with the fuses on the right and the switches on the left. An option would be to have the switches to the right of the backup instruments, they would then however not be nicely in front of the pilot.
31.12.2007: Happy New Year to everybody, and let’s hope 2008 will be a plane building year…